Showing posts with label recipes. Show all posts

Tuesday, April 3, 2012

Easy-Peasy Trail Mix and A Sunburn

Here's me Monday morning, enjoying the sunshine.


Here's me Monday night, cursing the sunshine.


And to answer your question, no it will not turn into a golden bronze tan after the red. That would just be too easy wouldn't it? My skin goes from ghostly white, to red, and fades to a nice off white. :) Ahh the joys of being fair skinned!

Anyways, after working in our yard all day, I was tired and wanted a healthy pick me up. I wanted sweet and salty and didn't want to feel like crap after eating it, and I came up with something so delicious that I had to share!

Outta the Cupboard Trail Mix:
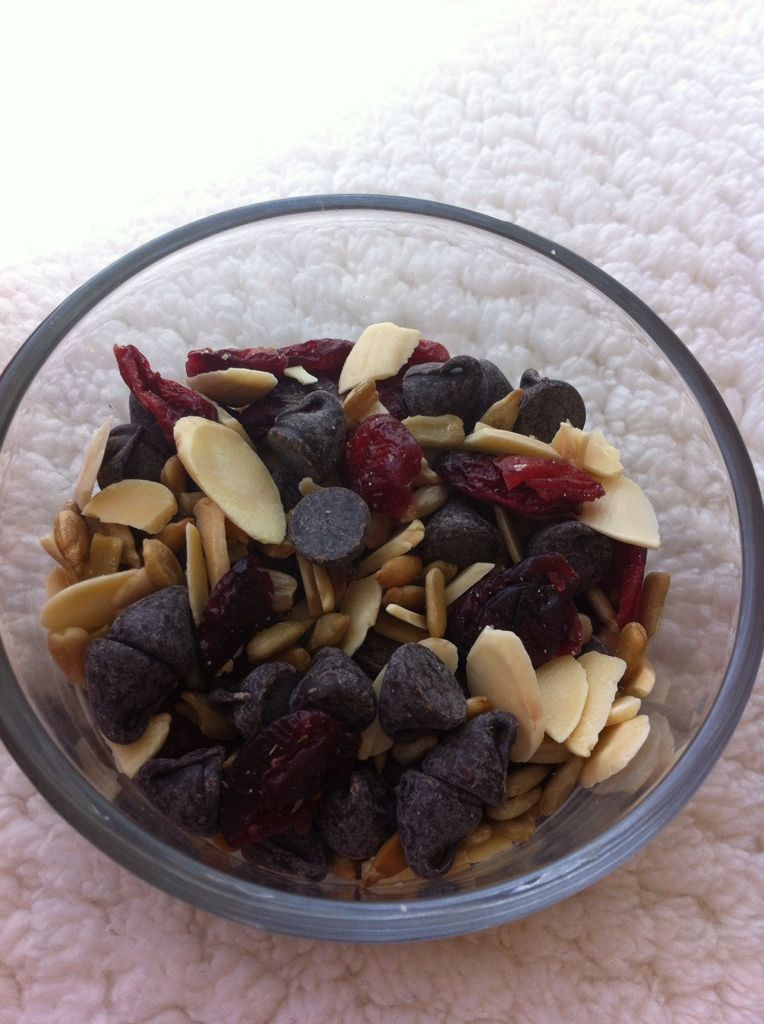


Ingredients:
Sliced almonds (raw, unsalted)
Sunflower seeds (roasted, unsalted)
Dried cranberries
Semi-Sweet Chocolate Chips (enough so that you get chocolate with every bite!)
All ingredients from Trader Joe's.


Mix together and enjoy! 

Wednesday, February 15, 2012

Easy Cinnamon Rolls From Scratch!

So after finishing my juice cleanse, I tried not to go too crazy with the treats :) I mean I did do it for the health benefits and don't want to just undo it all. 

That being said, I searched for a cinnamon roll recipe that didn't have butter and/or oil as the primary ingredients. I found this one on the Happy Housewife and am excited to share it with y'all!

First, gather all your ingredients. You will need:


 Dough:

  • 2 cups whole wheat flour
  • 3 teaspoons baking powder
  • 1/2 teaspoon salt
  • 1/4 teaspoon baking soda
  • 1/2 stick butter (softened)
  • 3/4 to 1 cup milk
  •  Filling:
  • Butter
  • Brown Sugar
  • Cinnamon
  •  Icing:
  • 3 tablespoons butter (softened)
  • 3 cups powdered sugar
  • 3 tablespoons cream cheese (softened)
  • 1 teaspoon vanilla
  • Milk
Preheat your oven to 375 degrees. Next, mix together all your dry ingredients. Then cut in the butter. Add milk until the dough is nice and sticky.

Roll out the dough on a floured surface.
Next, spread the butter, then brown sugar, then cinnamon on top. I used our juicer screen as a sifter. I'm sure the makers of the juicer would be proud :)
The recipe says to use as much as you like. I used only two tablespoons of butter and I wish I had used more. My cinnamon rolls ended up slightly dry. Edible but not gooey! Now that this is done, you roll it all up and slice it into little cinnamon rolley goodness..

I sprayed the pan first with Trader Joe's olive oil spray.
 Bake for 25 minutes. I am in the altitude so I only did 21 minutes & they turned out great. While they are baking - here comes the best part - mix together the cream cheese & butter, then add powdered sugar, vanilla and milk.
yummm!
When you pull the cinnamon rolls out of the oven, drizzle douse in frosting and enjoy!


I fed all the maintenance guys this morning and they gave it the seal of approval! Let me know if you make them & what you think!

Wednesday, January 11, 2012

Peanut Butter Protein Cookies


I don't bake very often, because usually baked goods upset my tummy {more on my tummy later. another post for another day}. Last year, my health obsessed roommate used to make these babies all the time and I loved them because they dont hurt my stomach AND they're good for ya! She found the recipe in Oxygen mag & I adapted a few things. Thanks Mariesa :)

Ingredients
1 large egg
1 1/2 cup natural peanut butter
1 1/2 cup whey protein powder [vanilla, chocolate, or unflavored. I use Chocolate]
1/4 cup pure cane sugar [or 1/4 cup sugar substitute]
1/2 cup almond meal
1 tsp baking soda
1/2 tsp vanilla extract


Preheat oven to 350 degrees. Lightly beat egg. Add remaining ingredients and mix well. Form little balls with your hands and place on lightly greased baking sheet. Don't use stonewear, they STICK!! Bake for 12 minutes. Balls will puff up lightly brown. Cool for a few minutes before eating. Only 100 cals each if you roll into 16 cookies! :)


mine crumbled because I used the Pampered Chef bar pan. Use a metal one :)


YUM-O! Enjoy my friends!

Friday, December 16, 2011

Crock Pot Santa Fe Chicken & A Trick!

It's time to share one of my very favorite crock pot recipes! This recipe is super duper easy & tastes delicious. I love getting recipes off of Skinny Taste because I know that not only will they taste amazeballs, but they are usually healthy & that means they wont upset my stomach [I'm sensitive to dairy, gluten, sugar, etc etc etc]. So pretty much means that I can always count on Gina to provide me with an all around "good" meal. Also, her recipes are healthy but not skimpy. They are always always always filling, and even Zach agrees! He is a tough one to satisfy, he is not afraid to tell me 15 minutes after consuming a meal I worked hard on, that he is STARVING. But never with this meal! Without further ado, I give you:

Crock Pot Santa Fe Chicken a la Skinny Taste

Ingredients:

  • 24 oz (1 1/2) lbs chicken breast
  • 14.4 oz can diced tomatoes with mild green chilies
  • 15 oz can black beans
  • 8 oz frozen corn
  • 1/4 cup chopped fresh cilantro
  • 14.4 oz can fat free chicken broth
  • 3 scallions, chopped
  • 1 tsp garlic powder
  • 1 tsp onion powder
  • 1 tsp cumin
  • 1 tsp cayenne pepper (to taste)
  • salt to taste

What to do:

Combine chicken broth, beans, corn, tomatoes, cilantro, scallions, garlic powder, onion powder, cumin, cayenne pepper and salt in the crock pot. Season chicken breast with salt and lay on top. Cook on low for 10 hours or on high for 6 hours. Half hour before serving, remove chicken and shred. Return chicken to slow cooker and stir in. Adjust salt and seasoning. Serve over rice. Voila!

Now you have a delicious meal for only 190 calories per serving. Pretty stellar if I do say so myself!

I forgot the cilantro, and the fact that I live 45 minutes from a grocery store made it so that we just went without. It was still delish, but I do love me some cilantro.


And now for my trick that I am so graciously sharing with y'all! Do you know how to shred chicken easily & without getting it under your finger nails? It's okay, I didn't know either until a few months ago. I used to wait until it cooled, then pull it apart with my hands [which I hated, because I loathe touching food with my bare hands]. 

Until one day someone showed me this!
Please excuse the awkward angle & poor lighting. Apparently photography is not in my husband's future.
All you do is use two forks to pull the chicken away from the other one. You can make it as fine or chunky as you like depending on how much you shred each part. Piece of cake, right?! You're welcome.

Now go crock & shred away!
Let me know if you make it & what you think of it!